
Mac computers are undeniably so popular and yet it goes without saying that Windows users are far too many. This is the reason why a lot of external hard drive manufacturers and USB sticks pre-format their devices to NTFS.
This format has been developed for Microsoft that helps users to easily plug their drives into Windows machines and work with files. As NTFS is proprietary, Apple will need a special license to make full use of it on the Macs they offer.
Instead of doing this, macOS was designed to read, but not to write NTFS-formatted drives. In other words, as a Mac user, you can only open and view files on Windows drives: you can’t change them anyway, nor can you copy new files to NTFS format disks.
Here are several solutions to get full read/write access to NTFS drives.
1. Free Third-Party Drivers
There is a free and open-source NTFS driver that can be enabled on a Mac to allow write support. Unfortunately, this takes a bit of extra work to install, particularly on Macs with the new System Integrity Protection feature introduced in 10.11 El Capitan. It’s slower than paid options, and mounting NTFS partitions automatically in read-write mode is a security concern.
2. Paid Third-Party Drivers
There are third-party NTFS drivers for Mac that you can use, and they’re going to run pretty well. There are paid solutions, but they are easy to install and should provide better performance than free solutions.
3. Apple’s Experimental NTFS Write Support
The macOS operating system provides experimental support for writing NTFS drives. It’s off by default, though, and takes some playing around in the terminal to activate it. It is not guaranteed to work properly and could possibly create issues with your NTFS file system. We just don’t recommend that you use this. It’s disabled by default for a reason.
FUSE for macOS
This technique is free, but it takes a lot of effort, and it’s less secure. To make your Mac mount NTFS partitions automatically in read-write mode, you will need to temporarily disable System Integrity Protection and replace one of Apple’s built-in tools with a binary that is more vulnerable to attack. This approach is also a security issue.

However, you can use FUSE to mount NTFS partitions in read-write mode manually if you don’t mind using the Terminal. This is more secure, but it’s more work.
First, download FUSE for macOS and install it. Use the default options when installing it.
You’ll also need Apple’s command line developer tools installed to continue. If you haven’t installed them yet, you can open a Terminal window from Finder > Applications > Utilities and run the following command to do so:
xcode-select –install
Click “Install” when you’re prompted to install the tools.

You will also need to download and install homebrew if you haven’t already installed it on your Mac. Homebrew is a “package manager” for Mac OS X. Copy-paste the following command into a Terminal window and press Enter to install it:
/usr/bin/ruby -e “$(curl -fsSL https://raw.githubusercontent.com/Homebrew/install/master/install)”
Press Enter and enter your password when prompted. The script will automatically download and install Homebrew.

After installing the developer tools and Homebrew, run the following command in a Terminal window to install ntfs-3g:
brew install ntfs-3g

You can now manually mount NTFS partitions in read/write mode. From a terminal window, run the following command to create a mount point at /Volumes/NTFS. You only need to do this once.
sudo mkdir /Volumes/NTFS
When you connect an NTFS drive to the computer, run the following command to list any disk partitions:
diskutil list
You can then identify the device name of the NTFS partition. Just look for the partition with the Windows_NTFS file system. In the screenshot below, it’s /dev/disk3s1 .

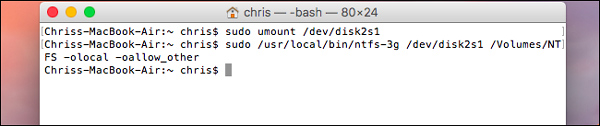
The NTFS partition was probably automatically mounted by your Mac, so you’ll need to unmount it first. Run the following command, replacing /dev/disk2s1 with the device name of your NTFS partition.
sudo umount /dev/disk2s1
To mount the drive, run the following command, replacing /dev/disk2s1 with the device name of your NTFS partition.
sudo /usr/local/bin/ntfs-3g /dev/disk2s1 /Volumes/NTFS -olocal -oallow_other
You’ll see the file system mounted at /Volumes/NTFS. It will also appear on your desktop as a normal mounted drive. You can eject it normally when you want to unplug it.
If you’re happy manually mounting partitions with the above instructions, you don’t have to continue.
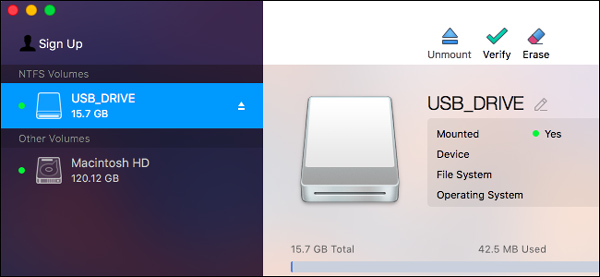
Paragon NTFS for Mac
Paragon NTFS for Mac costs $19.95 and includes a 10-day free trial. It can be cleanly and conveniently installed on new models of MacOS, including MacOS 10.12 Sierra and Mac OS X 10.11 El Capitan. It does “just work,” so it’s the best choice if you’re prepared to spend a small sum of money for this feature.
You’re also not going to have to fiddle with terminal commands to manually install partitions, unsafely mount partitions automatically, or contend with possible corruption like you do with the free drivers below. If you need this feature, it’s worth paying for the program that does it properly. We can’t emphasize it enough.
If you own a Seagate drive, be mindful that Seagate is offering a free download of Paragon NTFS for Mac, so you won’t have to buy anything extra.
You could also buy Tuxera NTFS for Mac, which costs $31 and provides a 14-day free trial. Yet Paragon NTFS does the same thing, except it’s cheaper.
Apple’s Experimental NTFS-Writing Support
We’re not recommending the method below because it’s the least tested. This does not work perfectly, so don’t blame us or Apple if you’re having trouble with it. It’s still unstable for macOS 10.12 Sierra, and it may never be fully stable. It’s really just here for educational purposes.
First, make sure your drive has a handy single-word label. If it doesn’t, change the name. This is going to make this process simpler.
You’ll first need to launch a terminal. Navigate to Finder > Applications > Utilities > Terminal or press Command+Space, type Terminal, and press Enter.
Type the following command into the terminal to open the /etc/fstab file for editing in the nano text editor:
sudo nano /etc/fstab

Add the following line to nano, replacing “NAME” with the label of your NTFS drive:
LABEL=NAME none ntfs rw,auto,nobrowse
Press Ctrl+O to save the file after you’re done, and then press Ctrl+X to close nano.
(If you have multiple NTFS drives you want to write to, add a different line for each.)

Connect the drive to the computer—unplug it and reconnect it if it’s already connected—and you’ll see it under the “/Volumes” directory. In a Finder window, you can click Go > Go to Folder and type “/Volumes” into the box to access it. It won’t pop up automatically and appear on your desktop like drives normally do.
To undo this change later, just repeat the above process to open the /etc/fstab file in nano. Delete the line you added to the file and save your changes.
Many Mac users would be best off formatting external drives with exFAT, guaranteeing they operate properly on both Windows and Mac OS X without any additional work. If you need to write to an NTFS drive, one of the paid third-party drivers would be the simplest choice with the highest performance and the least chance of file corruption.