
It’s safe to say that Windows 10 is Microsoft’s most efficiently coded operating system. However, it also has quite a lot of features that hog huge amounts of system resources. That means that with continuous use, the performance of your computer could still slow down.
Yes, this is bound to happen despite the latest iteration having built-in features that are designed to improve overall efficiency. The usual suspects include temporary files, bloatware, and less powerful hardware. Therefore, it is a must that you learn how to speed up Windows 10 so you can crank up your machine when you notice it’s lagging.
You’re in luck because it’s not as hard as it sounds. From defragging and clearing out unwanted programs to disabling superfluous special effects and even performing hardware upgrades, let’s discuss how to speed up Windows 10.
1. Disable Programs that Run on Startup
One reason your Windows 10 PC may feel slow is that you have so many programs running in the background—programs that you rarely or never use. Stop them from running, and the PC will run more smoothly.
Start by running Task Manager: Press Ctrl-Shift-Esc, right-click the bottom right corner of your screen, and select Task Manager, or type Task Manager in the Windows 10 Search box, and press Enter. If the Task Manager is running as a compact app without tabs, press “More Details” at the bottom of your window. The Task Manager would then appear in full.
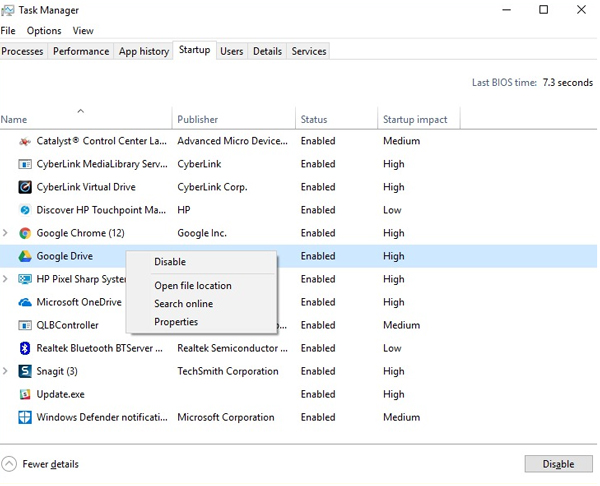
Click the Start tab. You’ll see a list of programs and utilities that are enabled when you start Windows. Included in the list is the name of each program as well as the publisher, whether it is allowed to run on startup, and its “Startup Impact,” which is how much Windows 10 slows down when the system starts up.
To stop a program or service from running, right-click it, and choose “Disable.” This doesn’t actually disable the program; it only stops it from starting—you can still run the application after it is launched. Also, if you decide later that you want it to be launched, you can just go back to this section of the Task Manager, right-click the application, and choose “Enable.”
2. Adjust the Power Settings
If you’re using the “Power Saver” plan for Windows 10, you’re slowing down your PC. This plan decreases the efficiency of your PC to save energy. (Even desktop PCs usually have a “Power Saver” plan.) Changing your power plan from “Power Saver” to “High Performance” or “Balanced” will give you an immediate increase in performance.
To do this, start the Control Panel app, then select Hardware and Sound > Power Options. Usually, you can see two options: “Balanced (recommended)” and “Power Saver.” To see the “High Performance” setting, click the “Show Additional Plans” down arrow.

To change your power settings, simply select the one you want, and then exit Control Panel. “High performance” gives you the most oomph, but requires the most power; “Balanced” seeks a comfortable compromise for power consumption and improved performance, and “Power Saver” does all it can to give you as much battery life as possible. Desktop users have no excuse to select “Power Saver,” and even laptop users should consider “Balanced” when unplugged—and “High Performance” when connected to a power source.
3. Turn Off Windows Tips and Tricks
When you use your Windows 10 PC, Windows keeps an eye on what you’re doing and advises on what you may like to do with your operating system. In my experience, I’ve seldom found these “tips” helpful. I don’t like the privacy ramifications of Screens, either, continually getting a virtual look over my shoulder.
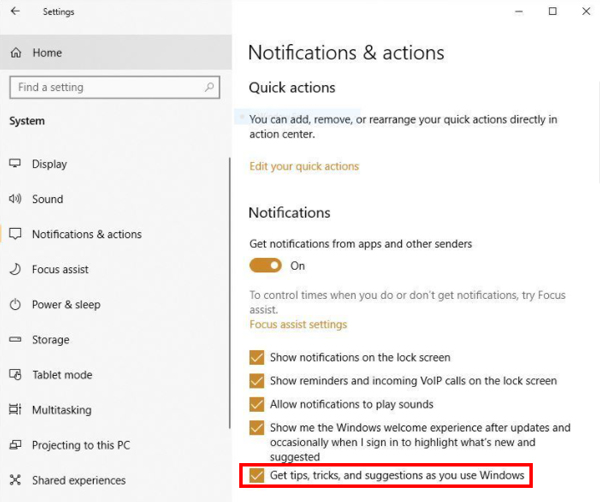
Windows seeing what you’re doing and giving suggestions will help your PC work slower. So if you’re trying to speed it up, tell Windows to stop offering you suggestions. To do this, press the Start button, select the Configuration icon, and then go to System > Notifications & Actions. Scroll down to the Notifications section and uncheck the “Get tips, tricks, and suggestions as you use Windows” box.
4. Clean Out Your Hard Disk
If you have a bloated hard disk loaded with files that you don’t use, you may be slowing down your PC. Cleaning it out will give you a boost in speed. Windows 10 has a remarkably powerful built-in feature to do this called Storage Sense. Go to Settings > System > Storage and switch the toggle from Off to On at the top of the screen. When you do this, Windows keeps track of your PC and deletes old junk files that you no longer need—temporary files, files in the Downloads folder that haven’t changed in a month, and old Recycle Bin files.
You can customize how Storage Sense operates and use it to free up much more space than it can usually do. Under Storage Sense, select “Configure Storage Sense or run it now.” From the screen that shows, you can adjust how much Storage Sense can delete files (every day, every week, every month, or when your storage space gets low).

5. Switch the Search Indexing Off
Windows 10 indexes the hard disk in the background, helping you—theoretically—to scan your PC quicker than if no indexing has been performed. But slower PCs that use indexing will see an output hit, and you can improve their pace by turning off indexing. And if you have an SSD disk, shutting off indexing will increase your speed, since the continuous writing to the disk that indexing does will gradually slow down your SSDs.
You need to switch indexing off entirely to get the maximum benefit in Windows 10. To do this, type services.msc in the Windows 10 search box and click Enter. The Services app will appear. Scroll down to either Indexing Service or Windows Scan in the Services Tab. Double-click, and from the page that shows, click Pause. Then restart the computer. Your searches may be a little slower, although you may not feel the difference. But you’re expected to get an overall improvement in results.

6. Clean Up the Registry
You need a Registry Cleaner to do this. There’s a lot available, some free and some paid. But there’s still no reason to buy one since the free Auslogics Registry Cleaner does a solid job.
Before using Auslogics or any other Registry Cleaner, you can back up your Registry so that you can recover it if anything goes wrong. (Auslogics Registry Cleaner does this for you as well, so it can’t hurt to have it backed up twice.) To back up your Registry, type regedit.ext in the search box, then click Enter. That runs the editor of the Registry. Select Export from the File menu. From the screen that appears, make sure you select the “All” option in the Export selection segment at the bottom of the screen. Then select the location of the file and the name of the file and press Save. To recover the Registry, open the Registry Editor, select Import from the File menu, and then open the file you saved.
Download, install and run the Auslogics Registry Cleaner now. On the left-hand side of the screen, you can select the kind of registry problems you want to clean up—for example, File Associations, the Internet, or Fonts.
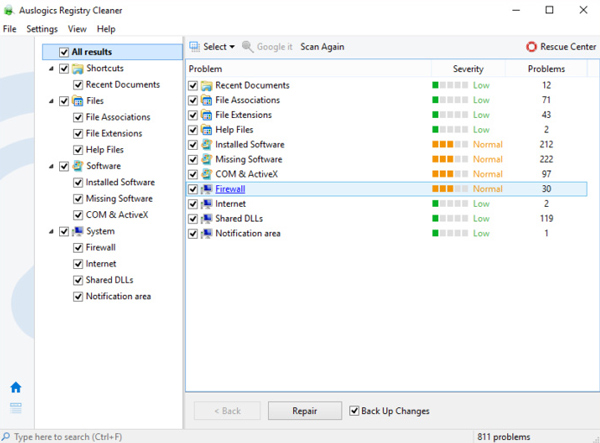
Next, tell it to scan the Registry for problems. To do this, click “Scan Now” and, from the drop-down menu that emerges, select Scan. This helps you to first analyze the issues of the registry that it detects. If you prefer “Scan and Repair” instead, you make the repairs without testing them.
It scans the Registry for errors and then tells you what it finds. It lists the errors according to their magnitude to help you determine which one to correct. Press Patch after you have made your decision to make sure the “Back Up Changes” were reviewed so that you can recover the Register quickly if anything goes wrong.
7. Defrag Your Hard Disk
The more you use your hard disk, the more fragmented it can get, which can slow down your machine. If the disk is fragmented, it holds data willy-nilly around it, and it takes time for Windows to put them together before it runs.
However, Windows 10 has a built-in defragmenter that you can use to defragment your hard disk. You can also tell it to run automatically to keep it continuously defragmented.
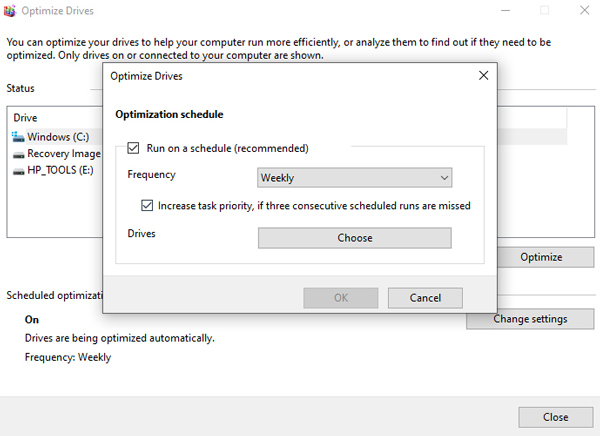
To do this, type defrag in the search box and click Enter. From the screen that shows, select the drive you want to defrag. To defragment it, click the Optimize button. Select several disks by holding down the Ctrl key and clicking on each disk you want to defrag.
If you want your disk or disk to be defragmented automatically, click the Change Settings button, then check the box next to “Run on schedule.” Now select the frequency at which you want the disk(s) to be defragmented by pressing the drop-down next to Frequency and choosing Daily, Weekly, or Monthly. You can also pick several drives for defragmentation from this screen.
8. Kill Bloatware
Perhaps the greatest cause for the slowdown on your PC is not Windows 10 itself, but bloatware or adware that consumes CPU and system resources. Adware and bloatware are especially insidious because they could have been created by the maker of the computer. You’d be surprised how fast your Windows 10 PC will run if you get rid of it.
First, run a system check to locate adware and malware. If you have already configured a security suite, such as Norton Security or McAfee LiveSafe, you can use it. You can also use Windows 10 built-in anti-malware app—just type Windows Defender in the search box, press Enter, and then hit Scan Now. Windows Defender is going to search for ransomware and delete any it finds.
It’s a good idea to get a second opinion, though, so try a free service like Malwarebytes Anti-Malware. The free version scans for ransomware and extracts what it finds; the premium version still offers protection to avoid infections in the first place.

9. Shut Down and Restart Windows
Here’s a tried and tested method: shut it down and restart it. Doing that would flush away any excess usage of RAM that cannot be cleared otherwise. It also kills processes that you may have set in motion that are no longer needed but can continue to run and slow down the machine. If your Windows 10 PC has been slowing down over time for no obvious reason, you may be surprised how much quicker it can work when you do this.
Just try any of these tricks, and you’ll find that you’ve got a faster Windows 10 PC.