Microsoft Office is a versatile application that is part of the Microsoft Office suite. Almost everybody has used Office 365 for personal or professional purposes, such as making papers, writing articles, journaling, creating graphics, writing emails, and so on.
Since Microsoft Word is an essential component of Office 365, we’ll concentrate on it and its basic functions in this guide. This cheat sheet brings you up to speed on the features added to Office 365’s Word for Windows desktop client since 2015.
Knowing How to Utilize the Ribbon Efficiently
Microsoft overhauled the Ribbon’s appearance in September 2018. It’s now flatter, cleaner, and less cluttered, with high-contrast colors that make the Ribbon’s icons and text easier to see. The blue bar at the top has also been reduced, and the tab names are now shown on a gray background. But it still functions the same way, and the majority of the commands are in the same places as in previous versions.

There is now a Help tab to the right of the View tab, which is a slight improvement to the Ribbon layout. In addition, the Ribbon’s appearance varies slightly between Word editions in Office 365. For example, in consumer editions, the Search box is placed to the right of the Ribbon tabs, but above the Ribbon tabs in enterprise editions.
To remove the commands underneath the tabs on the Ribbon, press Ctrl-F1, just as you did in previous versions of Phrase. (The Ribbon tabs — File, Home, Insert, and so on — remain visible.) Ctrl-F1 will bring up the commands again.
You also have other choices for showing the Ribbon. To access them, go to the top right of the screen and press the “Ribbon display options” button. A drop-down menu with three choices appears:
- Auto-hide Ribbon: Covers the entire Ribbon, with all tabs and commands under them. Click at the top of Word to bring up the Ribbon again.
- Show Tabs: This displays the tabs while hiding the commands under them. It is equivalent to pressing Ctrl-F1. When the commands underneath the tabs are concealed, press Ctrl-F1, click a line, or click the Ribbon display icon and pick “Show Tabs and Commands.”
- Show Tabs and Commands: By selecting this, you can see both the tabs and the commands.
If the blue in the title bar is too much for you, you can change it to white, dark gray, or black. To do so, navigate to File > Options > General. Click the down arrow next to Office Theme in the “Personalize your copy of Microsoft Office” section and choose Dark Gray, Black, or White from the drop-down menu. Choose the Colorful option from the drop-down list to make the title bar blue again. Just above the Office Theme menu is a drop-down menu for Office Background, from which you can choose to show a pattern in the title bar, such as a circuit board or circles and stripes.
The backstage area, which appears when you click File on the Ribbon, contains a useful feature: If you click Open, Save a Copy, or Save As from the menu on the left, you can see the cloud-based services you’ve linked to your Office account, such as SharePoint and OneDrive.
Each location now has its corresponding email address displayed beneath it. This is especially useful if you use a cloud service with several accounts, such as having one OneDrive account for personal use and another for business. You’ll be able to tell which is which at a glance.
Real-Time Collaboration
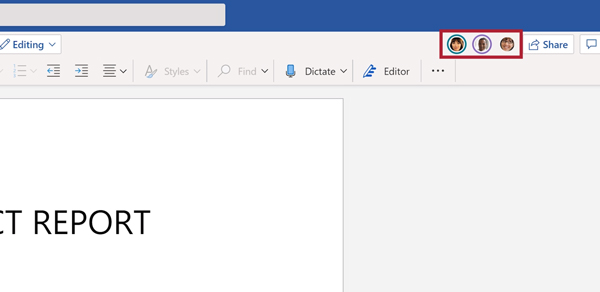
Real-time collaboration is one of the most significant features implemented in Word for Office 365 subscribers. It enables you to collaborate on documents with people from all over the world. The only condition is that you have access to the internet. This is comparable to a long-standing feature in Google Docs. Microsoft refers to this as “co-authoring.”
There are three collaboration criteria for Word in Office 365. You must be logged into your Microsoft or Office 365 account, the document must be saved in OneDrive, OneDrive for Business, or SharePoint Online, and AutoSave must be activated.
To collaborate on a document, open it and then click the Share icon in the top-right corner of the page. You will be prompted to save your file in SharePoint Online, OneDrive, or OneDrive for Business if you have not already done so. The next step is determined by whether your document is stored in your personal OneDrive, OneDrive for Business, or SharePoint Online.
If your files are stored in your personal OneDrive, they will be shared via the Sharing pane. If the files are stored in OneDrive for Business or SharePoint Online, you can use a newer interface designed by Microsoft in 2017 for enterprise Office 365 users.
If the document is in your personal OneDrive and you’ve saved it to OneDrive and hit the Share button, the Share pane appears on the right side of the screen—this is the central place for collaboration. Enter the email addresses of the people you want to collaborate with on the document in the upper pane, separated by a comma.
As you type, Word searches your address book and shows any matches it finds. Then choose the email address of the person you want to invite. If you are on a corporate network, you can check your corporate email address book by clicking the address book on the right. If the person you’re trying to invite isn’t already in your address book, just type in their full email address.
After you’ve entered the addresses, choose “Can view” or “Can edit” from the drop-down menu to grant collaborators read-only or full-editing access. If you want to grant different rights to different users, you can send two separate emails or change any collaborator’s permissions later by right-clicking their name in the Share pane.
You can type your message in the text box if you like. When you’re done, press Share. An email will be sent to those with whom you have shared the file, with an “Open” button that they can use to open the document.
There is another way to share a file saved in a personal OneDrive for collaboration: Click “Get a sharing link” near the bottom of the Share pane, and from the screen that appears, select “Create an edit link” if you want to create a link to the file that will allow anyone or a group of people to edit the file, or “Create a view-only link” if you want to create a link that will only allow it to be accessed and not edited. Then copy the link, write an email, paste the link, and send it.
If you want to send the file instead but don’t want anyone to collaborate on it, press “Send as attachment” at the bottom of the Share window. You can then send the file in either Word or PDF format. When you do this, any changes you make to the file after you submit it will not be reflected.
If your document is in OneDrive for Business or SharePoint Online, clicking the Share button displays a Send Link window. This is where you can send an email with a link to the document so that anyone can access it.
The default setting allows only the people whose email addresses you enter to edit the text. If you like, you can click “People you specify can edit” to bring up a “Link settings” screen, where you can grant access to anyone who has the link, such as anyone in your company or anyone who already has access.
