
When a font is designed, a certain amount of space is used for inter-character spacing. This spacing, called kerning, determines how close neighboring characters are to each other.
Unfortunately, not all characters appear the same width as they are read on a printed page. Depending on the characters, this may lead to an assumption that two characters are too far apart when in fact, they obey the normal spacing conventions for the typeface. This dilemma typically happens where the left character in a pair has a stroke (line) that moves diagonally from left to right.
By concept, kerning is a typographical term that describes the mechanism of bringing letters closer together in an attempt to overcome the idea of too much space between letters. This makes the text both more attractive and more readable.
Kerning is usually done only when the text is above a certain point scale because it is not visible in smaller sizes. You can now look at samples of kerned and unkerned text in Times New Roman at 100 points in length.

How to Change Space Between Character
Selecting Expanded or Condensed would shift the distance of all selected letters by the same amount. Kerning changes the spacing between specific pairs of letters and in some cases reducing or extending the gap depending on the letter.
- Select the text you intend to change.
- On the Home tab, click the Launch Font dialog box (or just press Ctrl+D or Cmd+D on Mac) and then click the Advanced tab.
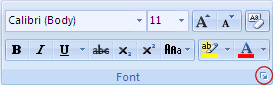
Word 2007 calls the tab Character Spacing.
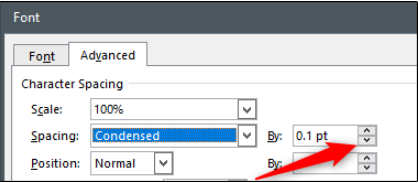
The Font window will be displayed. In the Advanced tab, click the Spacing box next to the “Spacing” box to display a list of spacing options. You’ve got three choices to pick from:
- Normal: This is the default spacing.
- Expanded: Increase the amount of distance between characters.
- Condensed: Reduces the amount of distance between characters.

In this case, we want to get our letters closer together so we’ll pick Condensed. Once chosen, change the amount of space to be removed from between the two letters in the By box next to the Spacing option. Click the down button to decrease the amount of space between characters. Even if you have previously chosen a condensed space option, pressing the up arrow will expand the space between the two letters.
Adjust the desired number and then press OK in the bottom-right corner of the window to apply the adjustments.
The space between letters will be changed accordingly.
How to Adjust Kerning in Microsoft Word Automatically
You can say Microsoft Word to automatically change the font kernel to and above a certain font size. This choice only represents the text you entered after you have activated the environment. If your Word document already includes text, you would need to pick all text in your Word document (Ctrl+A on Windows or Cmd+A on Mac) before proceeding.
Open the Font dialog box (Ctrl+D on Windows or Cmd+D on Mac) and in the Advanced tab, change the Spacing settings by pressing the up and down arrow next to the “By” box.
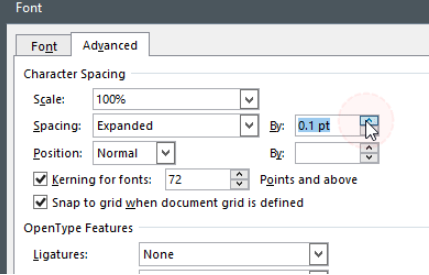
Next, check the box next to Kerning For Fonts and then enter the font size to the right of the text box to which you would like to add the rule. Note that this rule extends to any text in the document at or above the input font size.

To apply the changes, simply click “OK” in the bottom right.