
Google Forms is a great tool to collect information through forms. It’s completely free and allows you to make unlimited forms with your own style. You may set up questions with multiple choices, freewriting, or ranking scales. In this article, we’re going to teach you how to use the embed Google form.
WordPress users often use free form builder plugins for basic functionality. Although Google Forms stands out with a lot more functionality and simple WordPress and email integration.
What are Google Forms?
Google Forms isn’t the most powerful solution out there but the thing is, it’s not trying to. It is what it is—simple and straightforward.
The form building process is intuitive and includes all the types of questions you would expect, from checkboxes and short answers to multiple choices. You can insert pictures and videos, add paragraphs, and make limited changes to colors and fonts.
Just like other G Suite apps such as Google Docs, you can store Forms on Google Drive and work collaboratively with your team members on your baked-in sharing features. With a touch of Google Sheets magic, you can export data to a spreadsheet and get insights into the answers to your form.
If you’d like to create very simple forms that you can embed on your website for free, Google Forms is your choice. Just keep in mind that there are a few limitations to this free service, especially when trying to embed forms on your website.
Let’s Design a Google Form First

You’ll need to make sure you have a Google account before you do anything. If you’ve ever used any of the Google apps that most people on the planet have, you’re likely to have one.
Once this has been sorted head over to Google Forms. Scroll through the gallery and choose a template, or click the ‘+’ button to start fresh.
It’s up to you to create a form by adding the fields you want. Enter the questions, choose the types of your answers, and fill them in with the text editor.
The questions you ask will vary depending on the form you make. If you’re perfectly content, use the visual editor to make some basic changes to your theme.
When you’re ready to show your masterpiece to the world, hit send on the top right of the page. You can’t miss it.
That big purple button is your ticket to share your form via email, direct link, or by embedding it on your website.
Embed Your Google Form On Your Website
Whether you’re making a simple contact form or a visitor survey, chances are you’ll want to add a new, shiny form to your website.
To do this in Google Forms, press the send button and select a two-pointed bracket icon (<>). This allows you access to the built-in HTML. We’re going to explain what it is in a second.

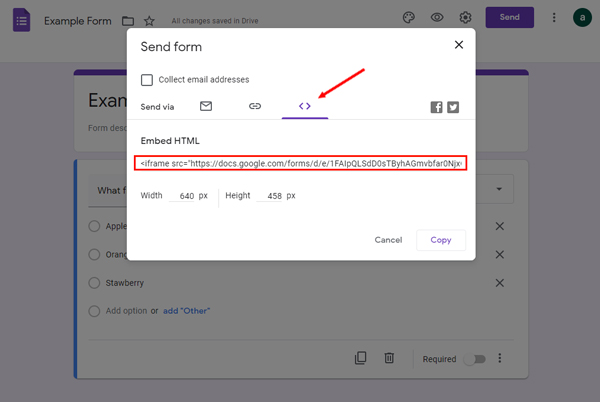
You will see an opportunity to adjust the dimensions of the type under the embed code. Make sure you’re pleased with the size, then copy the code and paste it anywhere you want to on your website.
You may make a dedicated page for your contact form or post an event registration at the bottom of your most recent blog post. Yours is the alternative. It doesn’t sound bad, doesn’t it?
The HTML embed is what you call an iframe, a piece of code that you place in a website to insert stuff like images, ads, and in this case, forms. Almost all of the form builders use these to embed their forms.
The trouble with iframes is that they offer a poor user experience. This is partly because they’re fixed in size, so if the content inside the frame is too large, the shape will be cut off and users will have to scroll around to see what’s inside.
They often behave differently depending on the browser – a form that looks nice in Google Chrome may look like anything in a kindergarten art project in Safari. This also impacts smartphone experience which means that Google Forms is not the most mobile-friendly form builder.
Unfortunately, without iframes, it’s difficult to embed Google Forms. You need a professional form maker to do that.
Embed Your Google Form in Email
It’s quick to embed Google Forms in emails. This method is especially useful if you want your users to send/fill in their answers directly from their inboxes.
Here are the steps:
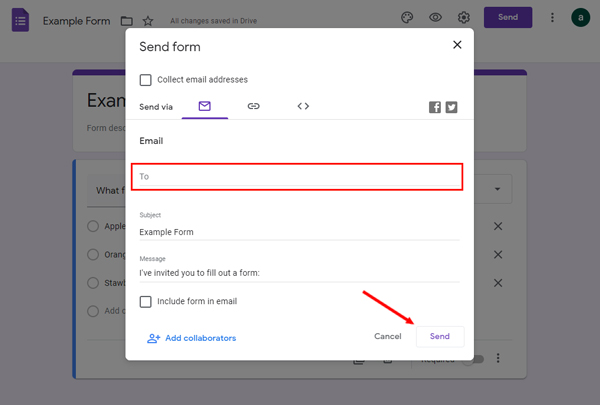
- In the “Send Form” pop-up, the envelope icon is selected by default next to the “Send via…” option.
- In the “Email” tab, add your separate e-mail list in the “To” area.
- Write your subject email in the “Subject” line.
- You can write your message to your users in the “Message” section.
- Now you have the option to “include form in email”
If you are 100 percent complete with all the questions you want to ask, you can continue to include the form in your email. But once the questionnaire is “included in email” to all your users, you cannot add/change the questions anymore.
There is one particular benefit when using this option: your users can see the form embedded in the email they receive and submit directly from there. Easy-peasy!
There are however some disadvantages:
- It doesn’t show your logo or header photos in your e-mail address if you have added them to your form.
- It won’t include your form if you break your form into a variety of sections.
6. If you have not selected the option to “include in email,” your users will be sent an email with the “Fill out in Google Forms” button. They will be routed to your Google Form by clicking on a new tab.
Embed Your Google Form to WordPress
We need to go to the Google Form embed website to create a form. Then, follow these steps:
- Sign in to your Google account and then select a default page or template from your gallery.
- Fill out the blank fields – title, description, and add questions. Include the kind of responses you like and add additional questions, titles, descriptions, photos, videos, or sections.
- Get a link once you’ve finished filling in the embed Google form and click send, located at the top right corner of the page.
- Copy the link by the “<>” embed icon from the pop-up window. Based on your preference, you can set the width and height of the form.
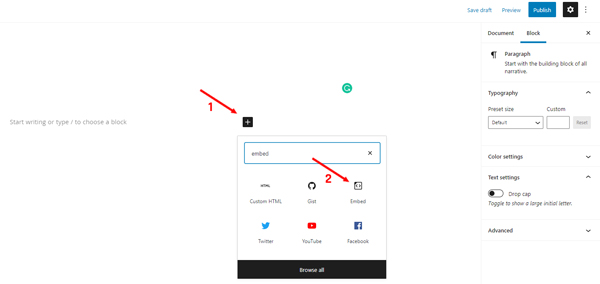
- Go to WordPress, create a new post, or edit a draft. If you need to add a link to a new WordPress layout, first click on the three-dot option to Edit as HTML.
- Then add a link to the HTML mode block.
- Preview to see how your form looks by switching to Edit Visually on a block other than preview.
- Publish your post as soon as you’re done.
- If you are using the classic WordPress editor, you need to choose the Text Editor tab and paste the Google Forms link.
- You can then switch to the Visual Editor tab to see the same result.

Wrapping Up
We can use Google Forms to collect feedback from our customers, survey or manage events, and much more. Embedding Google Forms to a website is easy if we know the right method. Keep in mind that Google Forms can handle basic data collection needs, but if you’re looking to build a more complex online form with conditional logic and payment integrations, best consider another option.