Using OBS (Open Broadcaster Software) to record has several advantages. For one, OBS allows users to separately record multiple channels of audio simultaneously, which means you can conveniently capture multiple commentators, on-screen/in-game sound, and video conferences from one program.
OBS also gives you the ability to use multiple video sources on-screen simultaneously, different camera and webcam angles, static graphics and screen captures, and layer these in order to produce professional-looking videos.

OBS is also well integrated with popular streaming platforms such as YouTube and Twitch so live broadcast won’t be a problem.
How to Setup OBS for Recording
- The first step, obviously, is to download and install OBS from their website. Then create a new scene and add sources to it.
- Create a new scene first, call it “My Scene 1.”

- Each scene should carry its own special source combination. You can create various scenes that can be swapped between for instant layout or configuration changes. You may get one close up with a webcam face, one with in-game screen capture with a tiny picture-in-picture view of your webcam. Changing one scene isn’t going to change another.
- Next, you want to include your media sources, which will depend on what you’re trying to capture (webcam/mic/internal, etc).
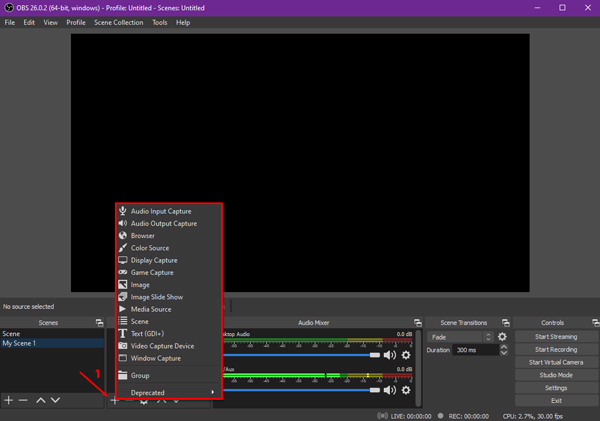
- Click to add a source to pick which media sources to record. Explore the Add Source menu to see which other media can be captured by OBS.
- You might want to search the Settings menu to make more advanced modifications. In settings, you can edit the recording format for both video and audio, with several specialized controllers on file types, file compression, video quality, and streaming options.
- Now you can record. All you need to do is press the “Start Recording” button at the bottom right, and then click Stop when you’re done.

- Before beginning your main recording, it’s always worth trying out a brief test recording first. There’s nothing worse than believing that you captured a wonderful performance, only to watch it back and remember that it didn’t capture all the microphones, or any other tiny yet devastating error. Record a one-minute video where you test all the microphones and video footage, then play it back and make sure everything is as needed.
How to Record a Webcam with OBS
Add a new source and click “Video Capture Device” to record from webcams. Press OK to create a new device, then select a webcam from the menu. You may also adjust the resolution of the image here. You can resize the webcam recording.

How to Record On-Screen Video With OBS
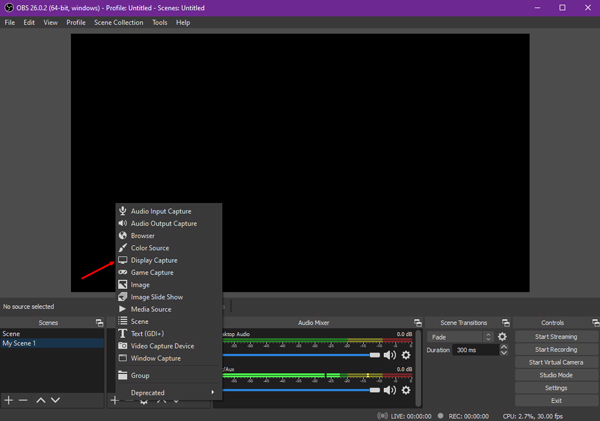
From the Add Source popup, select “Display Capture.”
Pick the device that you intend to record (0 will be a laptop screen, 1+ will be external monitors).
You can now see that the screen capture shows in the video display window. You can resize and transfer every media source on the screen.
How to Record Microphone Audio in OBS
To record external audio to OBS using a microphone, press to add a new source, then choose “Audio Input Capture.” Press OK to create a new input device, then pick the microphone you want to record from the drop-down display.

A new channel will emerge in the audio mixer. Use these meters to mix the audio to the desired level. The audio of the microphone will be captured in the video file.
All audio sources will be summed into a stereo audio track in the outputted video file. Right-clicking the audio mixer will show “Advanced Audio Properties” if you want more advanced audio mixing.
How to Record Internal Audio in OBS
If you choose to record OBS internal audio, add a new source and choose “Audio Output Capture.” Pick the default device or the output device you are using.

If you can see audio meters running, but you can’t hear a sound, you may need to use a monitoring system or a Multi-Output Audio Device. You’ll need to download Blackhole for Mac. Go to the Apple Audio MIDI Setup app, and create a new Multi-Output system that includes Blackhole and your main speaker output.
Choose this device from the OBS Audio Output Capture source. Check if you receive audio signals in the audio mixer meter. Be sure that the audio meters are not in red or your signal is distorted and the sound is of poor quality.
Now anytime you record all of the sounds that will come out of your speakers would be captured in your recording, this is a perfect way to record video games, conference calls, browsers, apps, and more.
How to Pause Recording on OBS
The benefit of using the pause function is that you can suspend the recording to take breaks, rearrange windows, or switch the settings around without making several files.
Click the pause button at the bottom right of the “Start Recording” button. It’s going to say “REC: Paused” in the bottom right status bar.

When you’re about to resume filming, press the pause button again. OBS will resume recording; you will see the start of the recording time counter from where you left off. When you playback the frame, there will be a smooth instant transition when you paused.
Where to Find OBS Recordings
OBS automatically exports to your video folder to your main documents folder. The easiest way to locate this location is by clicking (File > Show Recordings).

You can conveniently configure the custom location to which the recorded files need to be saved. Click Settings at the bottom right, then go to the “Output” tab, then the “Record” tab. From there, type or paste the folder location in the “Recording Path” window, or press the “Browse” button to find a folder.
Now, when you stop capturing, the files are saved in that folder.
If you cannot play a recording based on your preferred OBS recording format (MKV etc), you may need to Remux the format from the file type that your computer will read (File > Remux Recording). Choose an incompatible file and choose to remux to MP4 or MOV, since these are common types.