Are you curious about how to record your valuable Skype calls for review or later use? With Skype’s built-in recording feature, you can make podcasts, save cherished moments with your loved ones, or make sure nobody ignores what was mentioned at the most recent online meeting. Your Skype recording will be stored in an archive for 30 days, after which you can download and save it.
This article explains how to record Skype calls on Windows 10, Android, iPhone, and Mac.
Take note that you can record calls with people using various device platforms. Skype records everything during a call, including voice, side-by-side video streaming, and screen sharing. Make sure you’re using the latest version of the Skype app for Mac, Windows, Mac, iPhone, or Android.
How to Record Skype Calls on Mac
- Launch an audio or video call from Skype on your Mac. Click the + button on the bottom right of the screen, and then select Start recording to record the session. All participants will get a banner message at the top of their screens that you are capturing the current session.
- Just before the session ends, select Stop recording at the top of your screen or just leave the call.
- Go to the chat menu and select > More Options > Save to Download to save the recording.
Note: You can also use the QuickTime player on your Mac to record your audio or video calls for free.
Open QuickTime on your Mac, then select File > New Screen Recording.
To start recording your Skype call, click the Recording button, and then select the Stop button to stop recording or press Command+Ctrl+Escape on your keyboard.
How to Record Skype Calls on Windows 10
If you’re using a Windows 10 PC, the recording happens in the cloud (Microsoft servers) where it stays for 30 days, so you don’t need local storage to save it.
- To get started, open Skype and select the audio or video call button to start the session.
- Select the three-dotted button at the lower right side to open the menu.
- Next, select Start recording, and Skype will start recording your audio or video call.
- Find the menu at the bottom right-hand corner and select Stop recording. Conversely, click Stop recording on the upper left side of your screen.
- When you finish recording, you’ll see the audio or video conversation in the Skype chat box. From here you can save, play, share, or import it manually to save it on your computer.

You can download or delete the Skype call recording.
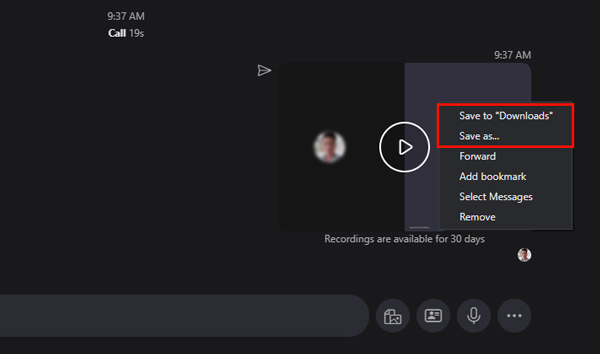
- To download the recording, go to Recent Chats, pick a conversation, and right-click the recording to open the menu. Select the > Save to Download menu.
- Choose the folder where you want to save your recording, assign it a descriptive file name, and then choose Save. The file is stored as an MP4 file.
- To delete the Skype call file, go to Recent Chats, right-click the recording you want to delete, and then pick Remove from the menu.
- Click Remove to erase the recording entirely from the timeline history of the Skype conversation.
How to Record Skype Calls on iPhone
With a simple tap, you can record Skype calls to your iPhone instead of having to take notes to capture everything.
- Open Skype and launch an audio or video call with your contact to get started. Click the three dots on the bottom right of your screen to open the menu.
- Tap Start recording as soon as your caller enters. After the session is finished, the recording will be visible in the Skype chat area.
- You will get a message on the top left of your computer indicating that the recording has started. Tap and hold the record to save it to your computer or share it with others.
Note: You will not be able to capture audio or video calls if you are not using Skype version 8.0. In this case, you can use a third-party app, such as a free MP3 Skype Recorder, which works with Skype version 7 and is free for non-commercial use. Some such applications include Pamela for Skype and Evaer Skype Recorder.
How to Record Skype Calls on Android
- To start capturing Skype calls to an Android smartphone, open Skype, tap the address book, and pick the person you want to dial.
- Next, tap the video or audio call button to initiate the call, and then tap the three dots on the bottom right of the screen to open the menu.
- Tap The Start Record button and the call will be recorded. Your contact will be informed of your recording of the call.
- When you’re done with the session, tap Stop recording at the top left. Alternatively, tap the menu at the bottom, then tap Stop recording.

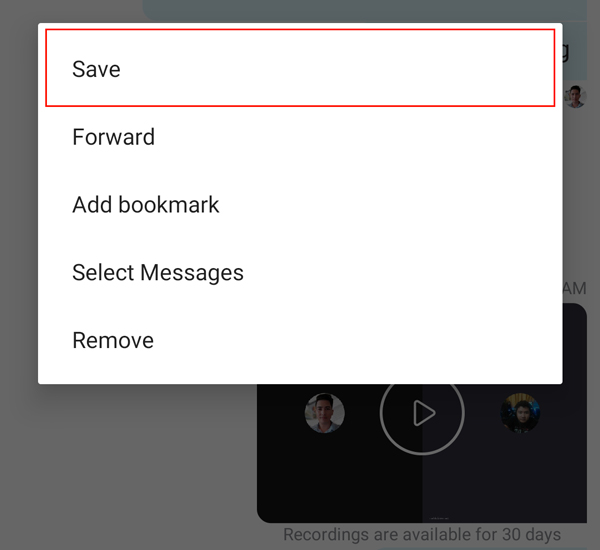
The recording is possible to save or share on the timeline of the Skype chat. To save, share, or delete the recording, tap, and hold the recording in the chatbox to see Save, Forward, or Remove options.
Recording Skype Calls is Easy!
No matter whether you go for a Skype built-in feature, or plan to give any third-party software a try, it’s never been easier to record a Skype call than it is now. All you need to do is choose the option that best suits you and start recording!